How to Use the Revit Plugin
Enable and benefit from RealityConnect for Revit to sync environments, adjust quality, manage assets, and enhance your Revit project with seamless Prevu3D integration.
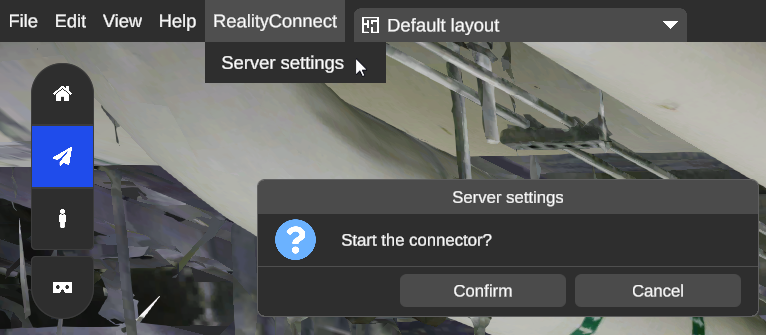
Enable the connection between Prevu3D and Revit
Section titled “Enable the connection between Prevu3D and Revit”From the top bar, go to RealityConnect -> Server Settings and Start the connection.
Features
Section titled “Features”RealityConnect Functions
Section titled “RealityConnect Functions”Sync scan
Section titled “Sync scan”This function allows you to bring the full environment into Revit either as a point cloud or a mesh. This will import the environment with the lowest quality level and place it using the shared coordinates. From there you will be able to leverage the Clip scan feature.
.png")
.png")
Clip scan
Section titled “Clip scan”The clip scan allows you to load a specific area at a different level of quality. You must use the Section box tool from a Revit 3D View to define the desired area. Use the Clip scan feature to improve the quality in some specific area without compromising performance.
The quality level selected will impact the loading time. There’s also some size limitation, a warning will be prompted if you are over the limits.
.png")
Sync Revit
Section titled “Sync Revit”This feature allows you to import your Revit project into Prevu3D RealityPlan. This reduce the amount of file based operation typically required.
.png")
Once the sync is completed, you can go on RealityPlan and continue the import process. We recommend using the Global positioning.
Show/Hide Full Scene
Section titled “Show/Hide Full Scene”Allow you to change the visibility state of the synched scans. It is quite useful to hide the synched scan if you did clip a specific area at a better resolution. It can be good to show it back if you want to clip another area.
RealityAssets
Section titled “RealityAssets”Load Assets
Section titled “Load Assets”This function allows you to bring RealityAsset defined from RealityPlan to your Revit project.
.png")
Browse and pick the desired RealityAsset.
.png")
Assign the RealityAsset to the desired Revit Family
.png")
You may enable the texture of the mesh using the Graphic display option below:
.png")
RealityConnect Settings
Section titled “RealityConnect Settings”Settings
Section titled “Settings”Allow you to change the application port number. We recommend keeping the default value (3000). Otherwise you would need to change the value on RealityPlan as well. See the screenshot below:
.png")